
IdentityServer3 with Custom grant flow and Windows authentication
What we are going to do?
- Setup and configuration of the
IdentityServer3. - Creating a client for the
IdentityServer3withFlows.OtherandAllowedCustomGrantTypes: "windows". - Setup and configuration of the
WindowsAuthenticationService. - Creating a custom grant validator in
IdentityServer3forwindowsgrant type. - Creating a console client and get a token from
IdentityServer3by using the currentWindows principal.
How does this all communicate?
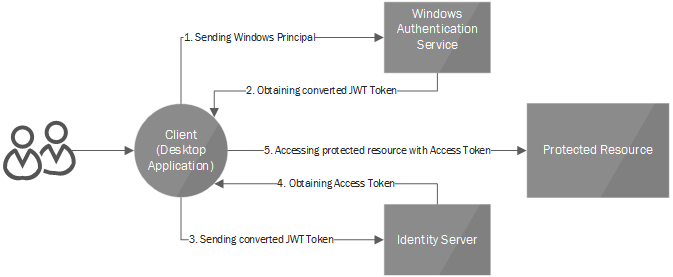
The client (in our case a WPF-based desktop application) calls WindowsAuthenticationService for converting his/her current windows principal to jwt token, which is trusted by IdentityServer3.
On the next step, the Client calls the IdentityServer’s /token endpoint (using custom grant: windows ), including in the request the jwt token got from WindowsAuthenticationService. IdentityServer3 will then issue a new token with requested scopes, custom claims and etc.
What are we going to achieve?
This configuration allows us to authenticate users in IdentityServer3 with windows authentication. In addition, we can add roles, claims to these users by using the IdentityManager.
1. Setup and configuration of the IdentityServer3.
Create a new empty ASP.NET web project. We are going to use OWIN-based web app hosted in IIS.
Install following packages:
Install-Package Microsoft.Owin.Host.SystemWeb
Install-Package IdentityServer3
Also, add the reference to System.IdentityModel assembly for validating tokens issued from WindowsAuthenticationService.
After that, we need a Startup class in order to configure our application and the IdentityServer3.
Add Startup.cs file (Right Click On Project > Add > OWIN Startup Class) to configure our app to use IdentityServer3.
I will not go deeper into the basics of the IdentityServer3 configuration. You can get more information about the IdentityServer3 configuring from the official documentation
Please Note
Don’t forget to enable SSL by selecting the project in the Solution Explorer of Visual Studio and then opening the Properties Menu (hotkey: F4). After that you also need to set the proper SSL enabled project url in the properties of your project in the “Web” tab’s ProjectURL field.
2. Creating a client for the IdentityServer3 with Flows.Other and AllowedCustomGrantTypes: "windows".
We are going to implement a Client with Flows.Custom and AllowedCustomGrantTypes: "windows". You can get more info regarding the Client configuration from the official documentation
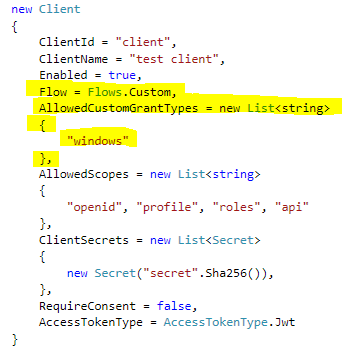
Because, in our case, all our users should come from windows authentication you need to disable the local login as depicted below.
3. Setup and configuration of the WindowsAuthenticationService
Again create a new empty ASP.NET Web project, add the Startup.cs as in the previous step and install the Owin.Host.SystemWeb NuGet for the new project.
We’ll also need the WindowsAuthentication NuGet package for issuing the jwt tokens based on the current windows principal. You can get this package by issuing this command from the Package Manager Console fo the Visual Studio:
Install-Package IdentityServer.WindowsAuthentication
Next step is to enable windows authentication for the project.
For IIS Express (F4 properties menu)
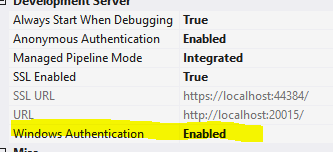
For IIS (uncomment this line in web.config)

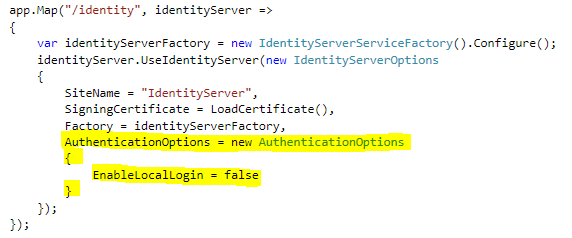
Next step is to configure the IdentityServer.WindowsAuthentication. Here is an example of the configuration:

Please note the highlighted lines in the screenshot. You should load the same certificate that is used for the IdentityServer, and you should set EnableOAuth2Endpoint property to true, which allows us to get jwt tokens by requesting a custom grant from WindowsAuthenticationService’s /token endpoint.
As in previous steps please don’t forget to enable the SSL in Projects’s Properties Menu (F4) and update ProjectURL in the “Web” tab of the Project properties.
4. Creating a custom grant validator in IdentityServer3 for windows grant type
Now the most important part is to teach our IdentityServer3 to understand the windows grant type.
For that, we need to implement the ICustomGrantValidator interface. You can read more about the Custom Grant Validators
from the official documentation
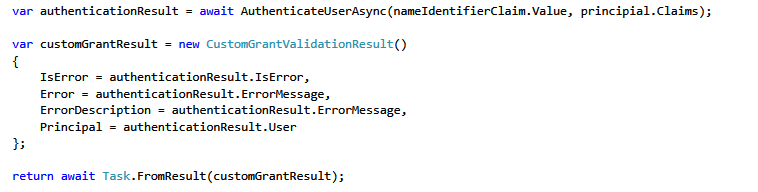
We must define what information must be included in the custom grant request when we are granting access to windows grant type. Primarily we need the jwt token which is issued by WindowsAuthenticationService. We will store this jwt token in the win_token property.

After that, we need to validate that win_token is issued from our WindowsAuthenticationService.

Now when we have validated token next step is to get a unique identifier for our user. We’ll store it in the NameIdentifier claim.
Now we are all setup for authenticating the user in IdentityServer3 and issue token for the client.
5. Creating a console client and get a token from IdentityServer3 by using the current Windows principal.
Now when the all the configuration is done let’s write a simple console application that will test our configuration.Create a new ConsoleApplication and install Thinktecture.IdentityModel.Client NuGet package by using this command:
Install-Package Thinktecture.IdentityModel.Client
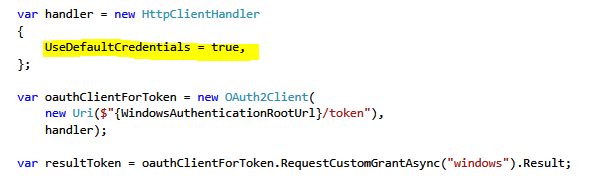
Now we need to connect to the WindowsAuthenticationService using Windows authentication and current principal. To achieve these we need to set the UseDefaultCrediantals flag. This will include our current windows principal in the request. As the result, we will get a jwt token that represents our current Windows principal.
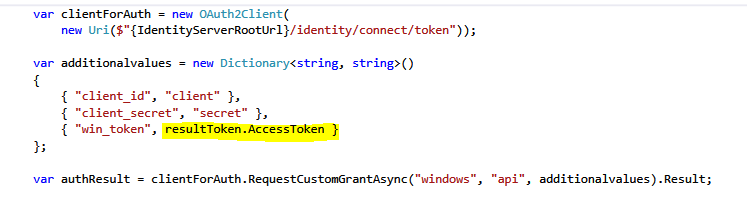
After that, we should extract the access token from the result (resultToken.AccessToken) and place it in the win_token param when requesting a custom windows grant from IdnetityServer3.
We are all Done!
A complete working sample can be found here: IdSrv3.WindowsCustomGrant.Sample.